- Настройка палитры Genesis Live на эхолотах Lowrance (Elite Ti / HDS Gen3 / HDS Carbon)
- Видеоуроки по LOWRANCE. Активация GENESIS MAP , настройка палитры глубин и другие приемы работы .
- Популярные публикации по теме
- Better Maps. Better Fishing.
- Accuracy makes all the difference.
- The world’s best community-sourced maps.
- Know where to go. Know what to throw.
- Compatible Devices
- Start catching the biggest fish of your life.
- Genesis Social
- Genesis Edge
- Custom-Color Depth Shading
- Bottom Hardness on Social Map and Private Maps (Edge)
- Submerged Vegetation Map (Edge)
- Sonar Screen Replay (Edge)
- Social Map
- Custom Contour Maps
Настройка палитры Genesis Live на эхолотах Lowrance (Elite Ti / HDS Gen3 / HDS Carbon)
«Новое обновление программного обеспечения добавляет функцию Genesis Live Charting для дисплеев Lowrance. Что позволит в режиме реального времени быть осведомленным о ситуации в неизвестной местности. Genesis Live невероятно прост в использовании. Так как для создания контуров глубины на карте использует данные с датчика эхолота. Данная функция имеет индивидуальные настройки для отображения картографии. Пользователи могут настраивать прозрачность, плотность контуров, нарисованных на экране до интервалов 15 см. А также настраивать палитру для отображения безопасной глубины, затенения и многое другое. Genesis Live карты могут быть сохранены на SD-карту для дальнейшего использования.» Источник: https://lowrance.ru/novoe-obnovlenie-programmnogo-obespecheniya-dlya-displeev-lowrance/

Основная идея этой статьи в том, чтобы рассказать как активировать все функции Genesis Live и настроить палитру. По большому счету в этом нет ни чего сложного, но имеется пара нюансов которые нужно учесть. Постараюсь не растягивать, а написать все лаконично и понятно.
Если ваш эхолот серии Ti, Ti-2, HDS Gen 3, HDS Carbon не имеет такой функции, значит вы давно не обновляли свой прибор. Genesis Live доступен начиная с прошивки 18.3. Обновите свой эхолот.
Заходим на сайт https://www.genesismaps.com и создаем аккаунт.

Для этого нажимаем кнопку Sign Up FREE в правом верхнем углу экрана. На появившейся странице, заполняем все поля. И нажимаем CREATE ACCOUNT. На указанную почту придет письмо с сайта с подтверждением регистрации. Перейдите по ссылке в письме.

Первый момент: в списке стран (поле Country) России вы не найдете. По каким-то причинам нашу страну исключили из реестра Genesis. Выбирайте любую понравившуюся вам страну или оставьте United States по умолчанию и спокойно регистрируйтесь.
Если у вас уже есть аккаунт, просто нажмите кнопку Log In в правом верхнем углу и зайдите на сайт с имеющимся логином и паролем в личный кабинет.

Здесь можно загрузить свои лоции и скачать уже имеющиеся на сайте. Ни одной карты России к сожалению скачать не удастся, как я писал выше, она почему то исключена. Регистрация на сайте нужна, для того чтобы один раз скачать лицензионную карту на ваш прибор, после чего все функции Genesis Live начнут работать.

Нажимаем ADD DIVICE и регистрируем ваш прибор. Необходимо заполнить всего четыре поля. Будьте внимательны, проверьте каждый символ, ошибки быть не должно, иначе Genesis не заработает.

В первом поле Plotter Name, напишите произвольное название, чтобы понимать какой это эхолот, если их два и более. В поле Model, выберите модель вашего эхолота. Serial # — это серийный номер вашего прибора. Его можно найти на корпусе экрана эхолота (штрих-код) или в приборе. Для этого включите эхолот, зайдите в Установки > Система > О приборе. В левом столбце второй абзац: Серийный номер. Эти 9 цифр перенесите в поле Serial #. Тут же в четвертом абзаце вы найдете Content ID (Содержание ID), который необходимо ввести в четвертое поле. ВАЖНО: если написаны заглавные буквы, вводите заглавные. При ошибке, карты не будут работать.
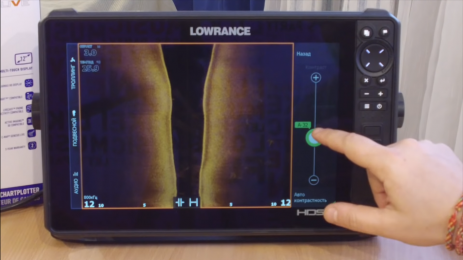
Далее нажимаем SUBMIT, ваш прибор зарегистрирован. Заходим в Social Map нажав на «плюс»:

В открывшейся карте, выберите любую понравившуюся вам капельку — это карта с уже отрисованными лоциями. И нажимаем кнопку Download.

Обратите внимание, чтобы в левом нижнем углу, после надписи «for plotter» числился именно тот прибор, на который планируется загрузка карты. Если зарегистрировано несколько приборов, выберите необходимый.


Нажмите Download Map. Справа появится второе поле, на котором нужно нажать Save File. Карта загрузится в архиве. Перейдите в папку, куда скачался файл (чаще всего это «Загрузки»). Разархивируйте карту в текущую папку или создайте отдельную для ваших карт. Появится папка с названием скачанного региона.
Далее нам понадобится MicroSD карта. Если вы уже используете в эхолоте, то возьмите ее. Если нет, то нужно завести. Приборы читают карты до 32 Гбайт, но можно использовать и меньшего объема, поскольку Genesis Live не требует много места.
Качаем разархивированную папку на карту памяти. На этом подготовка окончена. Если вы корректно ввели все данные при регистрации прибора, дальше все будет работать правильно.
Устанавливаем карту в прибор. Появится следующее поле:

Соглашаемся, нажав «Да». На карте появится тот участок который вы скачали, с отрисованным рельефом.

Теперь, когда лицензионная карта загружена на ваш прибор, все опции Genesis Live стали активны. Осталось настроить палитру.
Нажимаем «Больше опций» > «Параметры карты» > «Затенение» > «Настройка».
Если до этого вы все делали верно, то опции затенения будут активны и их теперь можно настроить.


Доступна настройка двух палитр: Глубина 1 и Глубина 2. В каждой палитре доступно установка 10 цветов. Но поскольку можно использовать одновременно 2 палитры, ваша карта может быть раскрашена 20 цветами.
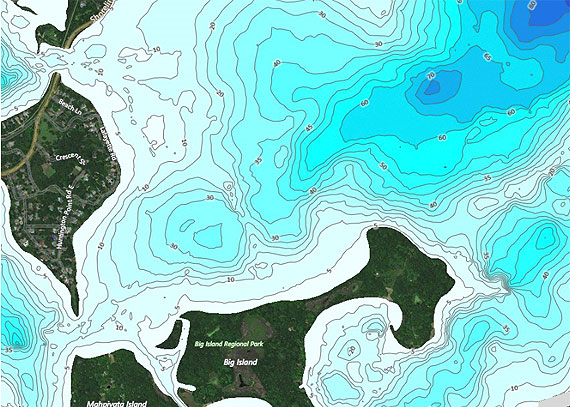
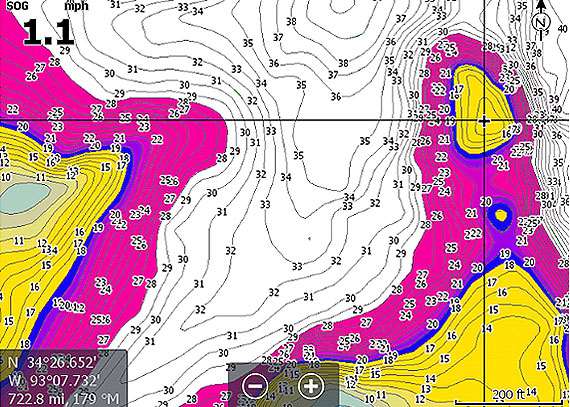
На картинках сверху видно как настроил глубину я. Красный цвет — самые мелкие участки, темно синий — самые глубокие. В нашем регионе ловля свыше 20 метров ведется крайне редко, поэтому у меня выставлены цвета через каждый метр.
Делается это очень просто. Выбираете первую строку, выставляете необходимую глубину (в метрах), выбираете цвет и выставляете прозрачность.

Чтобы картинка была максимально гармоничной, на «глубине 1» я выставил цвета шагом 2 метра с глубины 1 метр, прозрачность 100%. На «глубине 2» так же шагом 2 метра но с глубины 2 метра. Палитра такая-же, но прозрачность 50%.
На картинках ниже можно увидеть, что дает данная настройка.

Базовая настройка палитры выглядит очень блекло и сложна в восприятии.


По отдельности, настроенная глубина 1 и глубина 2 выглядят уже лучше, но самая оптимальная картинка получается при использовании обеих настроек одновременно:

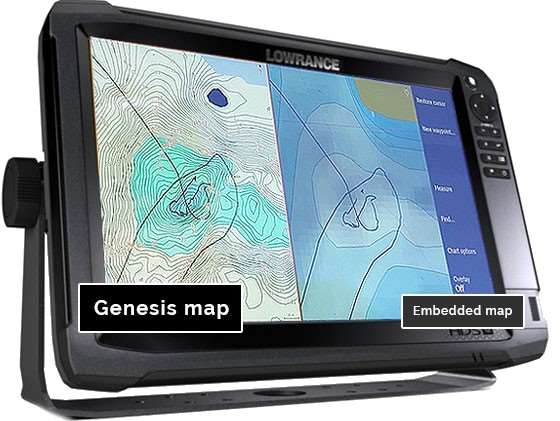
После того, как вы настроили палитру, можно сменить источник карт, выбрав, например базовые карты Lowrance. Но новые корректировки палитры будет возможно делать только выбрав источником карт ту, которую вы загрузили с сайта. После настройки палитры глубины, анализ отрисованных вами карт, становится намного понятнее и проще.
Надеюсь моя статья была полезна. Если есть вопросы, пишите в комментариях или лично мне.
Видеоуроки по LOWRANCE. Активация GENESIS MAP , настройка палитры глубин и другие приемы работы .
Популярные публикации по теме
Оказываем полный спектр услуг и поддержку в любом вопросе потому что любим своего клиента
Наш менеджер позвонит Вам в указанное время и ответит на все интересующие вопросы.
Вы в любой момент можете позвонить сами по номеру
8 495 646-88-68
назвать номер запроса (№ )
и задать интересующие вопросы.
Наш менеджер позвонит Вам в указанное время и ответит на все интересующие вопросы.
Вы в любой момент можете позвонить сами по номеру
8 495 646-88-68
назвать номер запроса (№ )
и задать интересующие вопросы.
Better Maps. Better Fishing.
C-MAP Genesis empowers you to create high-definition custom fishing maps and download
free Social Map charts of your favorite waterbodies.
Accuracy makes all the difference.
According to one published report, the maps available in the “vast majority of electronic cartography” are based on historical data from governmental agencies – data often 50 years old or more!
To get “1-foot contours” for maps of such lakes, companies run a computer program to estimate depths between government-drawn contours lines and then just fill in the blanks. That’s why you often see structure on your sonar screen where your map shows nothing.
C-MAP Genesis allows you to record your own sonar data, upload that to our cloud-based database and start seeing detail that isn’t available anywhere else.
The world’s best community-sourced maps.
Built on a base layer of existing sonar data, Social Map is updated continuously, in near real-time, with sonar data contributed by the C-MAP Genesis community – giving free users the most accurate charts with depths and for Edge account members bottom composition and other information.
To make the best maps, only (non-private) trips that meet the high standards of the GIS professionals on our Quality Control team are included in Social Map. Anyone with an account can download FREE Social Map charts to an SD card for use on the water in a compatible chartplotter.
Active Bodies of Water

Earth Hours on the Water
Know where to go.
Know what to throw.
Contours You Can Trust
Ever found a hump, ditch or drop-off not on any map? C-MAP Genesis creates contours you can trust, revealing fish-holding structure other maps miss.
View Feature

Vegetation Map
Big fish ambush little fish in submerged vegetation. Genesis Edge maps show the location, shape and depth of grass flats, deep weedlines, isolated patches and more.
View Genesis Edge
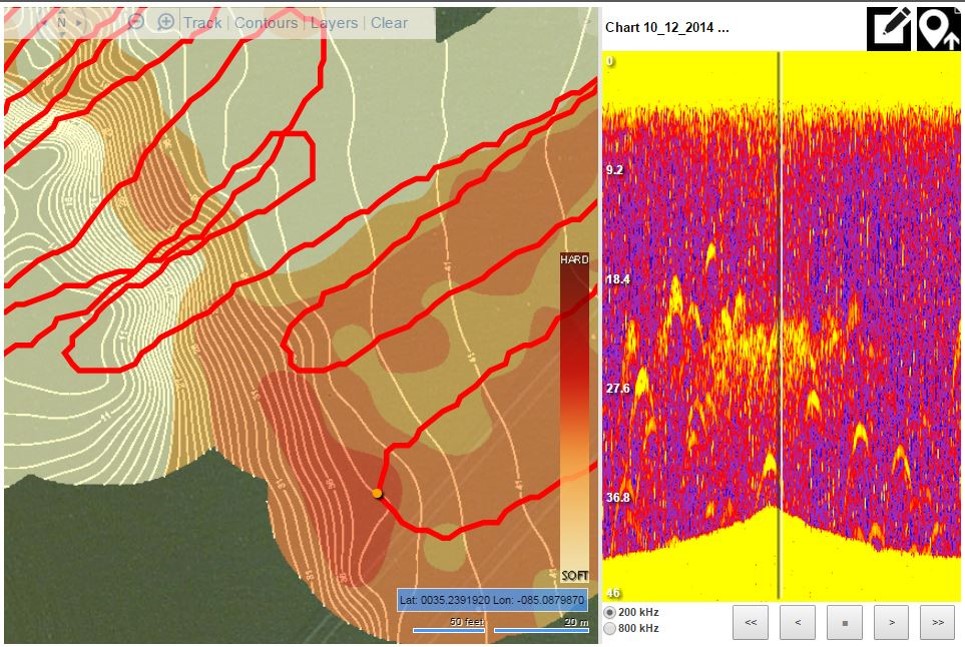
Bottom Hardness Map
Fish love hard bottoms. They feed on ’em, breed on ’em, follow their edges like roads. Genesis Edge maps show the location, shape and depth of hard-bottom areas.
Bottom-hardness layer available now for thousands of C-MAP Social Map charts, with Genesis Edge subscription
C-MAP Reveal charts feature photo-realistic sea floor imagery for Simrad, Lowrance, B&G users
Some C-MAP chart users require GPS-rollover software update to ensure Lowrance GPS functionality
C-MAP Genesis Edge chart helped Jordan Lee win inaugural MLF Bass Pro Tour tournament
Social Map now simultaneously displaying all charts available for download
Compatible Devices
- View full list
Start catching the biggest fish of your life.
Genesis Social
Upload personally mapped areas to the Social Map queue
Unlimited download of Social Map charts
Custom-color depth shading of downloaded charts for certain chartplotters
Create and get updates on Favorite Waterbodies
See list of recently uploaded sonar logs in your dashboard
Access to Bottom Hardness Social Map Charts
Personal trip and map lists archived online
Sonar Replay on all uploaded trips
Merge multiple trips into a single output and chart
Option to keep private any areas personally mapped
Genesis Edge
Upload personally mapped areas to the Social Map queue
Unlimited downloads of Social Map charts
Custom-color depth shading of downloaded charts for certain chartplotters
Create and get updates on Favorite Waterbodies
See list of recently uploaded sonar logs in your dashboard
Access to Bottom Hardness Social Map Charts
Personal trip and map lists archived online
Sonar Replay on all uploaded trips
Merge multiple trips into a single output and chart
Option to keep private any areas personally mapped
Custom-Color Depth Shading
Select from 16 colors to highlight as many as 10 customized depth ranges on both Social Map charts and private Genesis Edge maps. You can set two separate custom-color depth palettes for every map and easily highlight the fish-holding areas. Humps and holes, reefs and shoals, drains and ditches, ledges and breaklines will all be much more visible when set apart with custom-color depth shading.
Pro Tip: Synch a Lowrance HDS unit with Motorguide’s xi5 Pinpoint Lowrance Gateway, and you can easily set your trolling motor to autopilot your boat to follow your custom-color-shaded depth contours.
Custom depth shading is compatible with Lowrance HDS Gen 2, HDS Gen 3, Carbon and Elite Ti units. It is not compatible with Lowrance Hook and Lowrance Elite HDI, Elite CHIRP and Elite DSI units.
Bottom Hardness on Social Map and Private Maps (Edge)
Many fisherman “beat the bank” because they have more confidence targeting visible shoreline cover than offshore bottom structure. Those shallow fish get pounded hard, making them harder to catch. With a Genesis Edge bottom-hardness map you can fish the bottom as confidently as you do the bank, targeting the most productive places: offshore structures like ledges, sunken islands, saddles and more.
It overlays onto your contour lines a color-coded representation of the size, shape and location of areas of different bottom hardness: dark orange areas show the hardest bottom; a lighter orange indicates the next-hardest bottom; tan is the next-hardest bottom; and pale yellow shows the softest-bottom areas.
Submerged Vegetation Map (Edge)
It’s no secret that big fish ambush baitfish in submerged vegetation. What’s not always known is where the good green stuff is and what areas within it likely hold the most fish. In most weather and water conditions, submerged vegetation is not visible to the naked eye, so you have to go searching for it. And even when you see a patch on your sonar screen, you won’t know its full size, shape or thickness.
Genesis Edge’s vegetation layer shows fish-holding holes in vast grass flats, depicts fish-populated points and inside-turns on deep weedlines and more. It places bright-green overlays the size and shape of areas of submerged vegetation atop your blue contour map, making it as easy to see the best places to cast as when you’re throwing to visible cover like docks and laydowns.
Sonar Screen Replay (Edge)
C-MAP Genesis not only creates maps with 1-foot contours and a bottom-hardness layer for your favorite waterbodies, it literally records your dynamic 200hz sonar screen, creating, essentially, a video replay of every fish, bait ball, rock, hump or hard spot you drove over. This gives you a second chance to waypoint fish or structure after the fact, back at home, if you missed them while on the water. You can then export those «2nd chance waypoints» back to your compatible Lowrance, Simrad or B&G sonar/GPS unit and then pilot your boat directly to the areas they mark and get on a bite.
Social Map
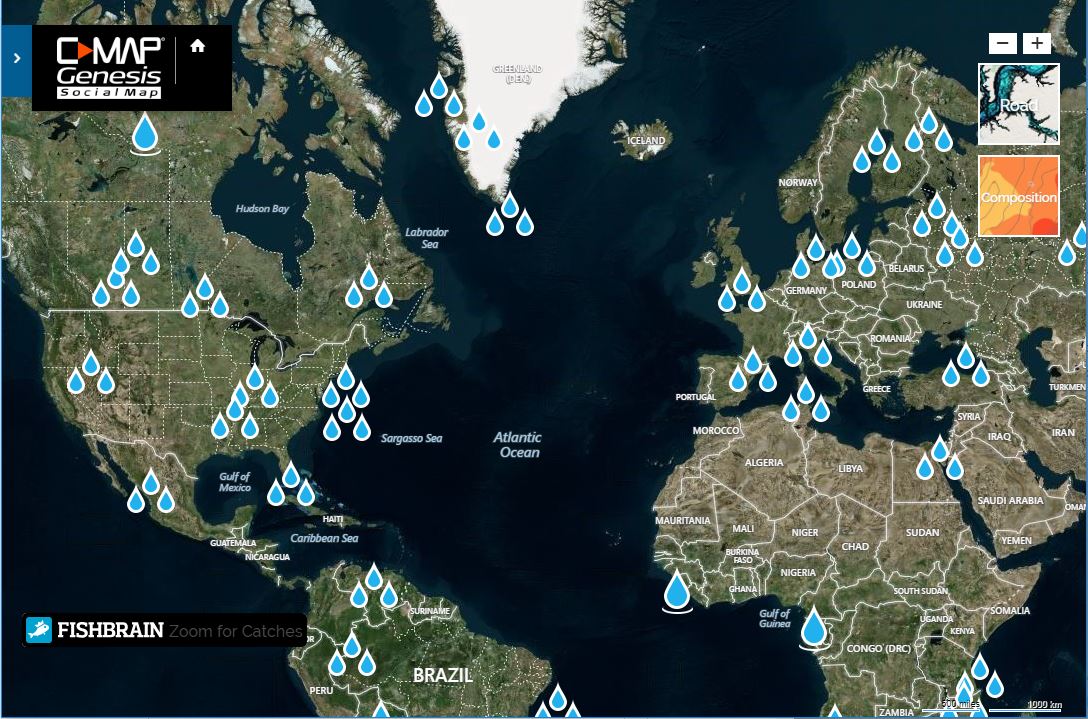
Social Map is a free, global, online collection of inland and coastal C-MAP Genesis charts generated by the Lowrance, Simrad Yachting and B&G communities of fishing, cruising, and sailing enthusiasts. Anyone with an account can download free Social Map charts to an SD card for use on the water in a compatible chartplotter.
To make the best maps, only (non-private) trips that meet the high standards of the GIS professionals on our Quality Control team are included in Social Map.
Blue water drops represent locations where sonar data has been voluntarily contributed by C-MAP Genesis users. Sonar data marked “private” is not aggregated in Social Map. Users with an Edge account can also see bottom hardness of the voluntarily contributed data. Click on the «Composition» icon found in the upper right corner in the Social Map page. Gray-shaded contours in Social Map represent legacy base-map data.

Custom Contour Maps
If there’s currently no map of your favorite waterbodies, the benefits are immediately apparent. If there IS an existing map of your favorite waterbody, how accurate is it? To get “1-foot contours” for maps of such lakes, companies can run a computer program to estimate depths between government-drawn contours lines and just fill in the blanks.
With C-MAP Genesis you can create 1-foot contours you can trust .You can discover and dissect “spot-on-the-spot” areas unknown to other anglers.
Blue-shaded depth gradations on your Genesis maps will make the structure you discover more apparent at a glance: darker blue indicates deeper water and lighter blue indicates shallower water.